Quantcast
Channel: BriMor Labs
Viewing all 59 articles
Browse latest View live

Analysis of a Windows 8 Memory Dump with Volatility 2.4 ("The New Hotness")

$
0
0

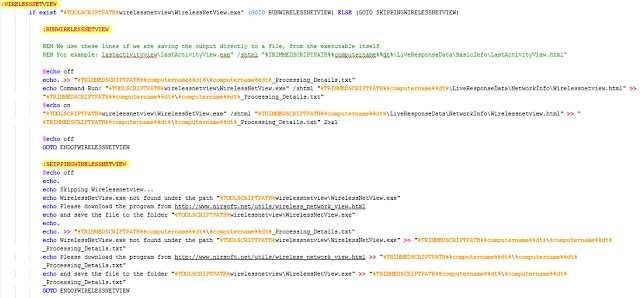
Hello again readers! Today's blog post is going to cover my initial experiences working with the newest release of volatility (version 2.4) and a Windows 8 memory dump I created using Belkasoft RAMCapture64 (part of the Live Response collection) during my Windo while working on my Bluetooth for data exfiltration series

I set this up on a Windows system, so if you are using a *nix system or OSX your set up details will be a little different, but the overall theme is the same.


1) SETUP

First of all, I had to download the 32-bit version of ActiveState Python (currently 2.7.8.10, which you can download here). Once that was downloaded and installed, I navigated to the volatility page to read more about the latest version (version 2.4, which you can read more about here here) which, among other things, now has support for Windows 8. I downloaded both the Volatility 2.4 Windows Standalone Executable and the Volatility 2.4 Windows Python Module Installer. Although I personally prefer to use the Python version that is usually found under "<PYTHONINSTALLPATH>/Scripts/vol.py", I grabbed the standalone version for eventual testing and comparison purposes. Installing the Python modules took just a few seconds and I was ready to move onto the next, but perhaps the most important, steps. According to the volatility website "the distorm3 python module is a requirement for analyzing 64-bit Windows 8 and 2012 raw memory images". So, I had to visit the distorm Google code page and download the latest version and install it. The last setup step was to visit the PyCrypto page and download the latest pycrypto modules to ensure that all of the volatility plug-ins can run with no problem. Without installing PyCrypto I kept getting messages like "The module "Crypto.Hash" is not installed" and "no module _MD4". Installing PyCrypto seemed to alleviate all of those error messages.

To summarize the tools and steps you must perform in order to run the Python version of volatility on a Windows system, you need (at the bare minimum):

ActiveState Python (32-bit)
Volatility 2.4 Windows Python Module Installer
Distorm3 Python Module
PyCrypto Python Module
 -- plus any additional modules that you desire, based off of plugins you run


-----or if you just prefer to use the standalone executable-----
Volatility 2.4 Windows Standalone Executable


2) ANALYSIS

With the release of Windows 8, quite a few changes were made with regards to "how" Windows memory is handled and "how" tools can work with the dumps. Fortunately for us, the volatility crew is keeping a Windows 8/2012 page updated with their findings. 

For the purposes of this post, I only wanted to perform some of the basic analysis steps, so I only cover running the plug-ins "imageinfo", "kdbgscan", and "pslist". However, I will be making another post in the Bluetooth for data exfiltration series as I dig into the memory dump to see what other artifacts that I can extract, so be sure to watch for that!


imageinfo

Time to complete: 1 hour, 53 minutes
Query:
vol.py -f "C:\Users\Brian\Desktop\Memory\ADMIN_LAPTOP_20140520_153701_mem.dmp" imageinfo
Although I already know what the OS profile is from the system that the memory dump came from (Win8SP1x64), I am treating this as if I had no idea and needed the information from "imageinfo" to make the profile determination.

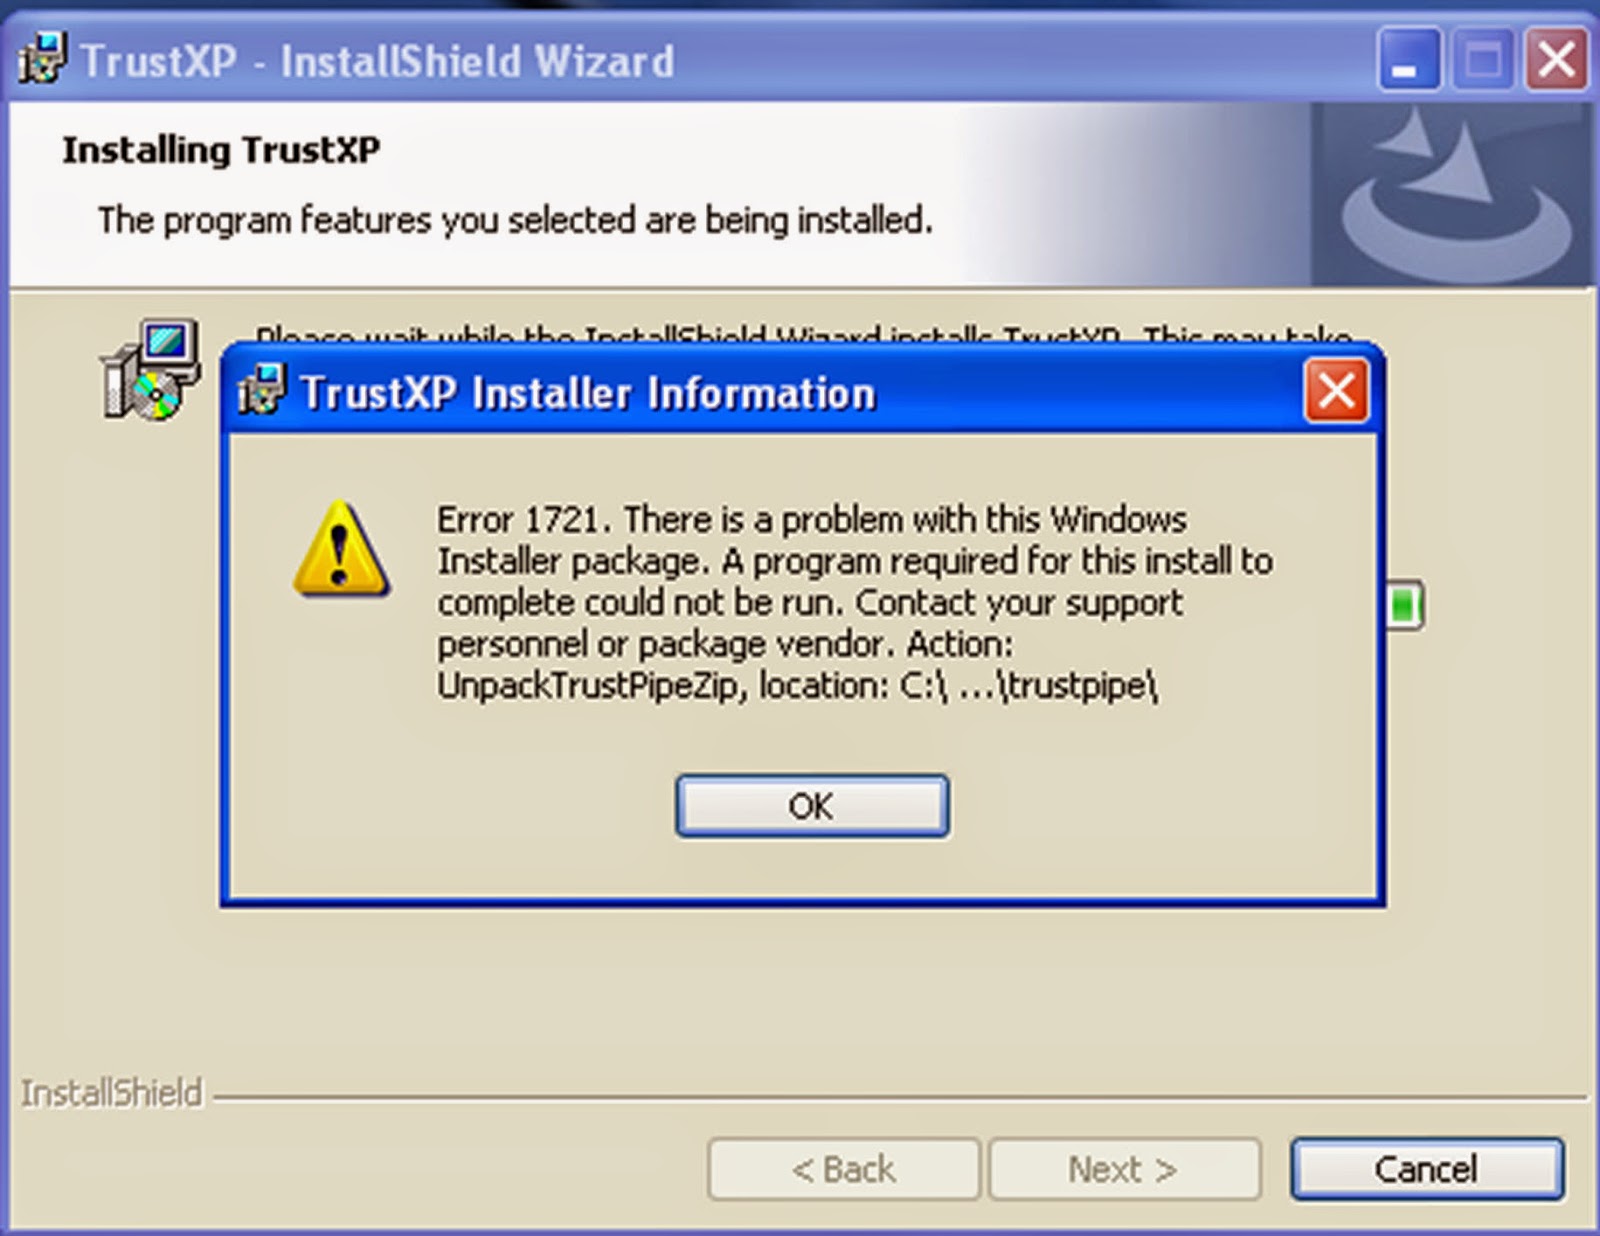
The "imageinfo" results gave me 4 possible suggested profiles and it gave me the kdbg address. However, since I know that with Windows 8/2012 I have to pass the virtual address of the KdCopyDataBlock rather than the address of the kdbg, thanks to the documentation by volatility crew, I need to run kdbgscan against my image.


The 2nd entry under best practices is probably the most important to note when dealing with Windows 8/2012 memory dumps


In order to save some time I would recommend running only "kdbgscan" and waiting for the results from that before running the "imageinfo" plugin if you absolutely need something from "imageinfo" that you cannot get from another plugin. You are going to get more of the information that you need to perform additional analysis from "kdbgscan" than you are from running "imageinfo" on Windows 8/2012 images (and at least in my case, it would have saved nearly two hours of work).


Running the volatility 2.4 and the"imageinfo" plugin against my Windows 8 memory dump


kdbgscan

Time to complete: 1 hour, 30 minutes
Query: 
vol.py -f "C:\Users\Brian\Desktop\Memory\ADMIN_LAPTOP_20140520_153701_mem.dmp" kdbgscan

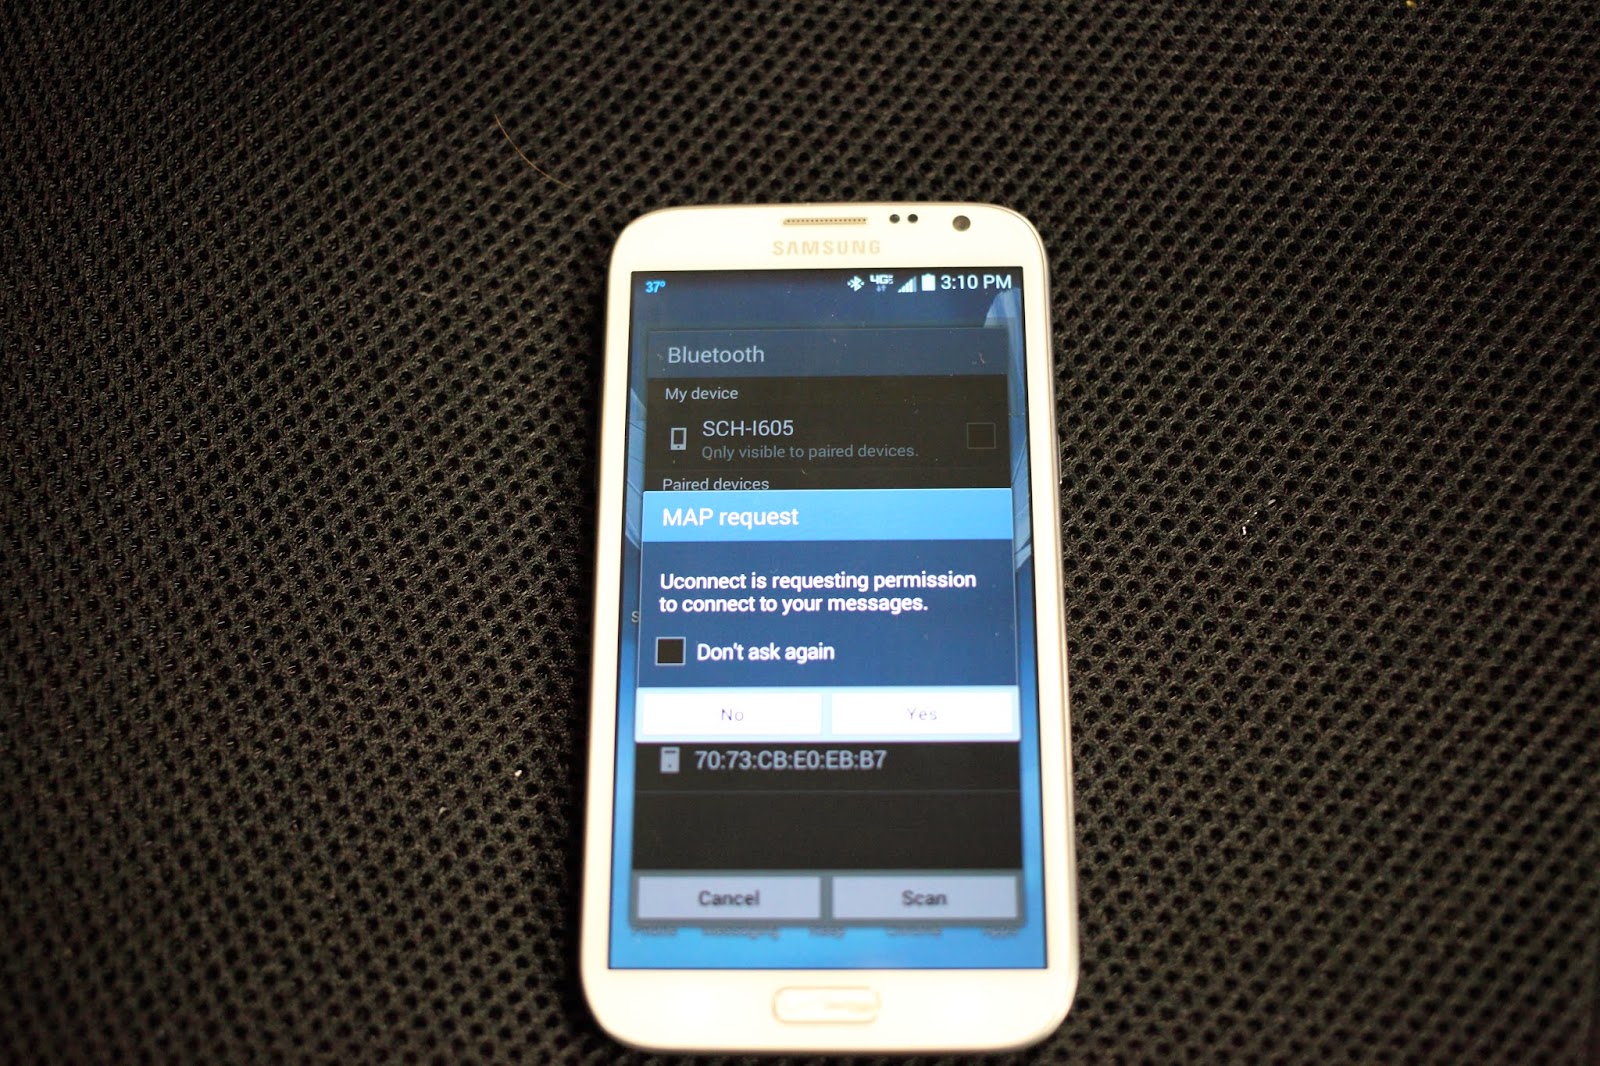
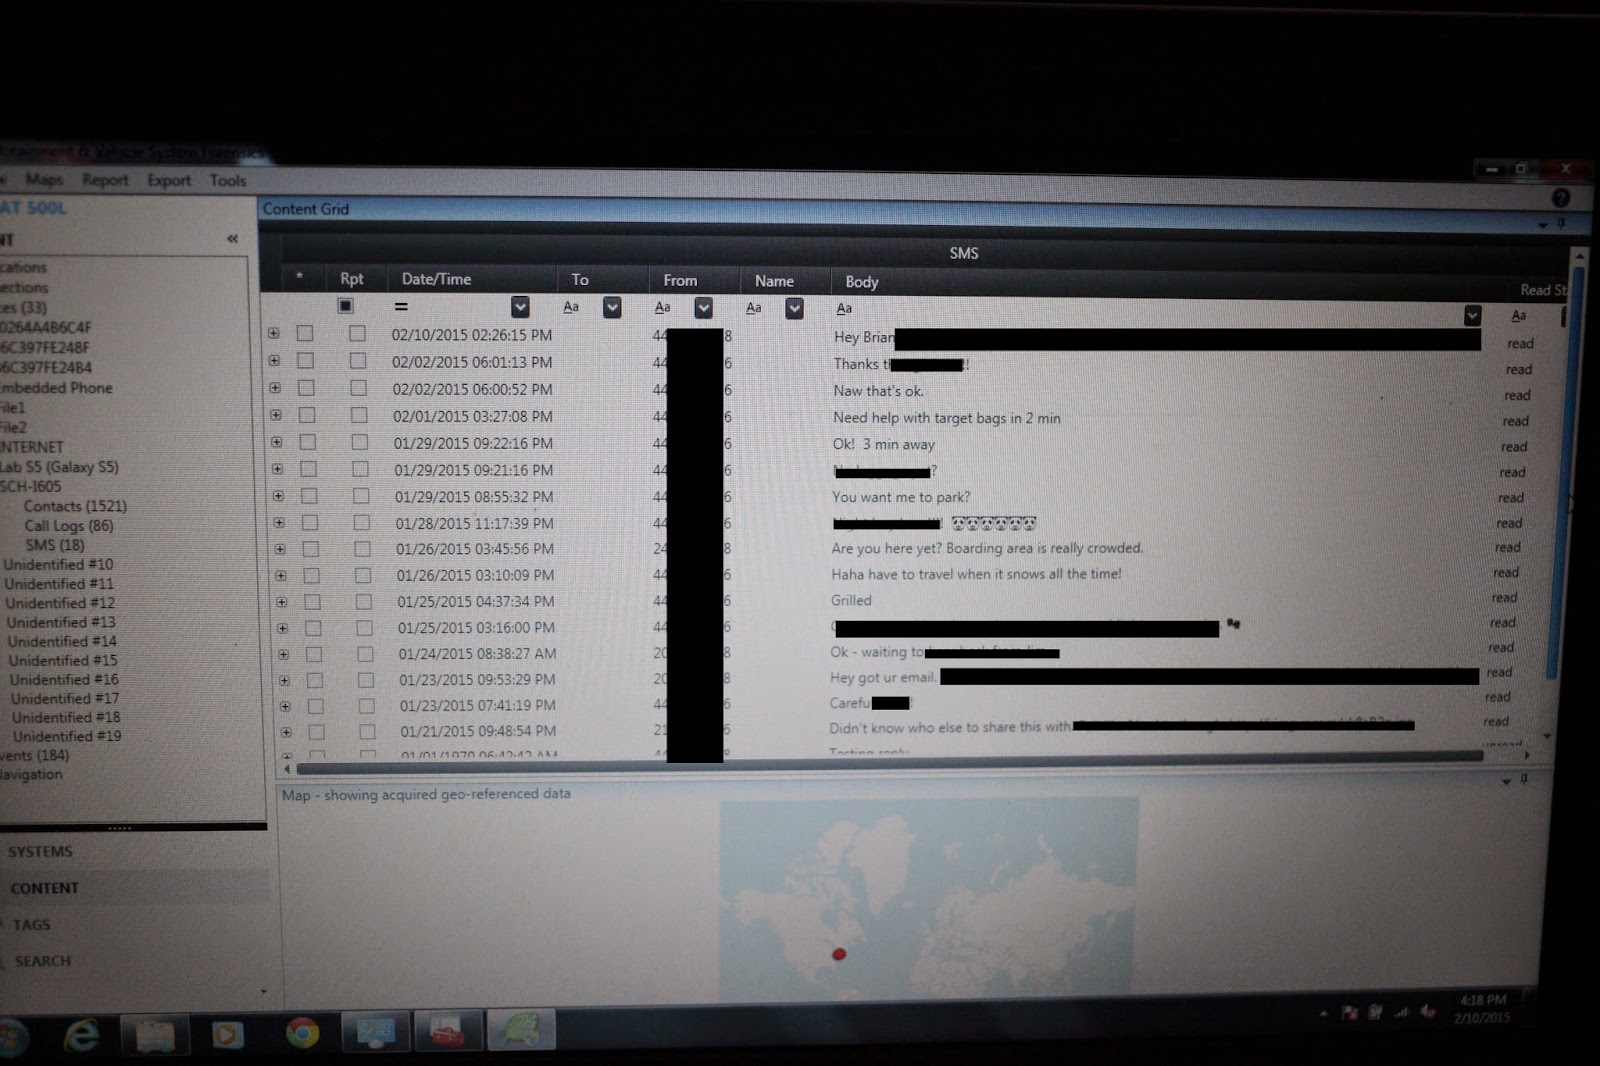
Running the "kdbgscan" plugin took just over an hour and a half to complete. However, it did find all of the data that I was hoping to find and then some. The plugin provided a total of four results. The results looked to be completely identical except that for each result it used a different profile (Win2012x64, Win8SP0x64, Win2012R2x64, ad Win8SP1x64). I was hoping that I could tell if some of them were incorrect or not based off of the PsActiveProcessHead and the PsLoadedModuleList results (covered in the Art of Memory Forensics book on page 64) but unfortunately this was not the case. I could take a guess and run through each of the profiles, but fortunately the Windows Live Response batch script in the Live Response collection collects a file named "Windows_Version.txt". Based off the data in that file, I know from that my version of Windows is 6.3.9600 (which is the version associated with the profile Win8SP1x64). So using the Live Response collection to help with your incident response/digital forensics case that requires memory dumps might be useful.... (hint hint!)


Running volatility 2.4 and the "kdbgscan" plugin against my Windows 8 memory dump (1 of 2)


Running volatility 2.4 and the "kdbgscan" plugin against my Windows 8 memory dump (2 of 2). My machine was running Windows 8.1 (6.3.9600) so my profile will be "Win8SP1x64" and my kdbg will be "0xf802b65e66d8" (KdCopyDataBlock virtual address)


pslist

Time to complete: 27 seconds
Query: 
vol.py -f "C:\Users\Brian\Desktop\Memory\ADMIN_LAPTOP_20140520_153701_mem.dmp" --profile=Win8SP1x64 --kdbg=0xf802b65e66d8 pslist

Now that I have both the profile and the kdbg (which, remember, is the virtual address of the KdCopyDataBlock on Windows 8/2012 dumps) I can begin my "normal" method of running plug-ins against the memory dump in an attempt to extract data from it. The response time is more along the lines of what I have seen with volatility in the past (just a couple of seconds) once you specify the proper profile and the proper kdbg (which in Windows 8/2012 is really the KdCopyDataBlock location (I really hope you remember that with as many times as that has been said in this post!))


Running volatility 2.4 and the "pslist" plugin against my Windows 8 memory dump. I specified the profile as "Win8SP1x64" and kdbg as "0xf802b65e66d8" (KdCopyDataBlock virtual address)


In my research so far, the main thing that users should be aware of is the processing time that it takes to analyze a Windows 8 memory dump in order to get the information you need to speed up additional analysis. But once you get the information you need from "kdbgscan" (REMEMBER, with Windows 8/2012 you need the pass the kdbg as the virtual address of KdCopyDataBlockit should increase the processing time of your queries considerably.


3) ????


4) PROFIT


SUMMARY

I am not certain if the longer processing time is with all Windows 8/2012 dumps or just those that are created using Belkasoft RamCapture. I will eventually get around to doing some memory dumps with other tools and seeing how volatility works against that format to see if there is a speed increase. I am also planning to give the standalone executable a more thorough testing but in my initial results the speed of using the executable only compared to the python script looks to be better by a few seconds. I don't know the reasoning for that, but if 

  1. I can reliably use the standalone executable to perform some of the functions and don't have to worry about Python dependencies (which seems to be the case),
  2. I can script the "standard" memory analysis, and
  3. It is faster,

then I will definitely use that more often. I have had better luck using the Python version in the past but that could change, I will keep you updated as my usage continues!! I'd like to thank everyone that has been and is involved with the development of the volatility framework for offering such an awesome tool for the absolutely low cost of free. And pick up your own copy of the "The Art of Memory Forensics" if you haven't already!!


Live Response Tool collection update (BONUS FEATURE) Searching the Windows Hashes file(s) using VirusTotal

$
0
0


Hello again readers! First off, I want to start the post by announcing that the latest update to the Live Response collection of tools is up; you can download it here:

LiveResponse.zip - download here

md5: 8a34559b4c681fa37bf608187daf07d0
SHA256: 2791d029f16227c82af65ce658016fb758242cca46bf3aa4750cd2d0be1dceff


Upload Date: 16 October 2014

The main highlight of this update is the inclusion of a Linux script that gathers data from a live system. I still want to add quite a bit of features and functionality to the script but I wanted to get a version out that automates most of the items listed in the Malware Forensics Field Guide to Linux Systems. Some of the items that the script collects are:

Copy contents of “log” folders
Determine date on the system
Determine hostname of the system
Determine logged in users on the system
Determine running processes on the system
Determine process tree (and arguments)
Determine mounted disks/items
Review output of disk utility
Determine loaded kernel extensions
Determine system uptime
Determine system environment
Determine (more detailed) system environment
Determine OS kernel version
Determine running process memory usage
Determine running services
Determine all loaded modules
Determine “who” logged in user is
Review .bash_history for each user
Determine current network connections
Determine socket statistics
Determine list of open files and network connections
Determine routing table
Determine ARP table
Determine network interface information
Review allowed hosts
Review denied hosts


This version includes a "Triage" version of the Windows script, but it does not collect a memory dump and it does not run WinAudit, to save some time (creating memory dumps and running WinAudit can take a long time). I still recommend running the full script whenever possible, but sometimes you don't need a memory dump or have the ability to create one with a different tool. I don't want to force you into using something else, so I took those two specific items out.


I also included checklists for each of the operating systems covered by the collection (Windows, OSX, and Linux) and updated a couple of items in the Windows collection like PEStudio and the latest version of FTK Imager. I kept the old version of FTK Imager as well which is why the size is roughly double what the previous size of the zip file was. I will phase out the older version in the next release but I wanted to keep it in case there is an imaging issue with the latest version. Please do not hesitate to provide any feedback (positive or negative) regarding the use of these freely available tools!


SUPER AWESOME BONUS FEATURE!!

I also try to ensure that the data from the tools can be use by other, already existing tools, and last week I encountered a prime example of using the output with a tool to get data that I was looking for.

As you may know, the Windows Live Response script attempts to identify executable files and hash those files which are located in the %WINDIR%\system32 folder, the %SYSTEMDRIVE%\Temp" folder, and ALL files in the %TEMP% folder. The script uses the program md5deep to perform these activities. My goal for this output was to search for the hashes on VirusTotal (or your malware repository of choice) and try to identify possibly malicious files that were on the system(s). 

Fortunately for all of us in the community, Didier Stevens already wrote "virustotal-search.py", a small Python script to perform queries using your own VirusTotal API key, with the added bonus of writing the script so that it can process data that kind of follows a specific format! So rather than having to re-parse the output data, if take the output from md5deep and you run his script with the "-c" flag (for "Comment"), it will look up the hashes and save them to a nice CSV formatted file for you. Then you just have to import the file into Excel, choosing the semi-colon (";") as your delimiter, and you have a nice view of what files have already been scanned to VirusTotal. It even takes into account the API query limits for the standard (free) API keys. Pretty cool!!


Contents of "Hashes_md5_User_TEMP_WindowsPE_and_Dates.txt" file created by the Windows Live Response script using md5deep


Running "virustotal-search,py"


Formatted results of the script. How awesome is that?!?!


Many small updates to the Windows Live Response collection

$
0
0


Good morning readers! Over the past few days I have had a little bit of free time, which I used to update several of the applications contained within the Windows Live Response collection.  cports, LastActivityView, md5deep, nmap, and PEStudio all were updated. I ended up removing both "full" versions of FTK Imager and just kept FTK Imager Lite as I felt having three FTK Imager options to choose from was a bit much. I also updated WinAudit to 3.0.8, but retained 2.2.9 just in case anyone had used that extensively and had written parser(s) for the data it presented. I also added an Excel spreadsheet in the Windows collection that lists the tool, the date uploaded, and the original website where the tool came from.


LiveResponse.zip - download here

md5: 8a34559b4c681fa37bf608187daf07d0
SHA256: 2791d029f16227c82af65ce658016fb758242cca46bf3aa4750cd2d0be1dceff


Upload Date: 16 October 2014

Spending $$$ on hardware won't fix the problem...you first have to understand what the problem is

$
0
0


As more and more organizations experience data breaches that are specifically targeting credit card processing programs, many in the sales and marketing areas are quick to say "If Organization X had only spent $5,000,000 on our latest greatest virtualized cyber cloud threat mitigation machine learning device..." More than likely the sales pitch contained some of those buzzwords and probably others as well. It also seems that many in the managed services (including some individuals within the incident response realm) are also attempting to convince anyone who will listen that some very expensive hardware or software (or both) solutions and costly services retainers will prevent these breaches from happening. The simple fact of the matter is that regardless of whether you possess the secretive schematics on how the flux capacitor works or if your company processes 749,392 credit card transactions every minute, a single solution will NOT stop your organization from being targeted


There seems to be a disturbing trend that the individuals responsible for the protection of the environment no longer have a full understanding of "what" is on the system/network and are increasingly relying on these very expensive products to generate an alert to tell them when something has occurred. While the amount of data and devices that the team(s) within your organization has to monitor is increasing, and these expensive products can help monitor the environment, a grass-roots, "back to basics" approach would help those responsible for security within an organization be able to recognize and detect threats more rapidly and more efficiently and can even help potentially minimize the depth and severity of a breach when it occurs.


Scenario using Goodwill data breach malware

In this particular case, I am going to cover a hypothetical scenario using malware that was utilized in the Goodwill data breach in which roughly 868,000 credit cards were compromised during a period from February 10, 2013 through August 14, 2014. By pairing free and available tools with commonly recommended security practices, the system administrator(s) could have easily detected and identified system(s) that were infected with this malware and potentially have stopped the breach shortly after the malware was installed on the system(s). In fact, based off the processes that the malware itself searches for, if the administrators had renamed the primary card processing software/services to something non-descript, it is possible that the breach may have not even occurred in the first place. 


In an attempt to replicate the environment, I renamed "notepad.exe" to "pms.exe" and pasted in modified Track data so that the malware will find the data, since (according to the Symantec writeup and strings within the file itself) that is one of the executables the program searches for). 


Strings in ncsvr32.exe. Note the regular expression looking for Track data at the top and the executable names the malware searches for at the bottom

Once that has been completed, I then loaded the malware onto my test system and ran it. The malware is very basic and not sophisticated at all. In fact, if there is a space in the path where the malware was run (for example, if you placed the malware in C:\Documents and Settings\Administrator\Local Settings\Performance Monitor") the malware will run and the folder and file (if there is data collected) will be created, however, subsequent writes to that file cannot be completed because the author(s) did not account for spaces in file paths. 


It appears the author(s) forgot to account for spaces in file paths


Secondly, the malware opens a command prompt window that actually lists all of the data that it captures. 
This window is open on every device infected with this malware. You can minimize it, but if you close it the program stops and it has to be manually restarted again


If you simply close the command prompt window, the logging process completely stops. While the window is open, the malware collects data from processes every 60 seconds. Based off of my own triage analysis, there did not appear to any persistence mechanisms, so once the executable is stopped it has to be manually restarted in order to start again. If a system administrator, security analyst, or even a non-technical employee had noticed the window open on a machine and had closed it, it would have stopped this sample of malware from collecting credit card information.


With the sample that I downloaded, the Track data is saved to the output file titled "data-pms.exe-2224.dmp". The data contained within this file is plain-text and there does not appear to be any encryption or additional obfuscation techniques used.


Plain-text Track data stored in the logging file. No encryption or any obfuscation attempted


The malware used in this case appears to be VERY unsophisticated, however as I have pointed out in the past, attackers will use malware that is only as advanced as it needs to be in order to accomplish their goals. In this case, this very basic and poorly written malware stole credit card transaction data from the Goodwill environment for over 19 months and resulted in nearly 868,000 compromised credit card numbers before it was stopped. It is paramount that network administrators/security engineers/incident response teams (or whatever name your organization labels your security teams) understand what is on the network and systems and what is supposed to be there prior to spending large amounts of money on hardware and network monitoring devices. All of the monitoring hardware in the world could have been in place and the Goodwill breach probably would have continued to go unnoticed in part because the attacker(s) probably used legitimate credentials to gain access to the network, the malware did not appear to use any network connectivity, and the malware was very basic and unsophisticated. This is my own speculation based on past experiences, but more than likely the attacker(s) managed to get credentials that allowed access to the network and after some reconnaissance, they were able to figure out where the data they wanted was stored and came up with an easy way to capture that data. Then, the attackers(s) probably either exfiltrated the data in an automated fashion (possibly a script) or the attackers remotely accessed the system(s) again to remove the data (based on the presence of an unencrypted logging file).


Without the understanding of what should be on these systems and monitoring the systems for items such as additional running processes, sluggish performance, open command prompt windows, etc. it does not matter how much money you spend on the high priced hardware and software solutions. Those solutions MUST compliment the understanding and comprehension of your security team. These solutions are not a replacement for practicing some of the fundamentals of information security.


Here are some quick tips you can take to reduce the possibility of experiencing a credit card breach, inside of your organization:


  • Rename your payment application to something non-descript
    • Instead of pms.exe, change it to chrome.exe or firefox.exe or itunes.exe. Or something else unique but not easily associated with "what" the program is doing. While calling your payment processing program "OMGItsSoFluffy.exe" is non-descript, having a very unique name can also sometimes be an indicator that something is important.
  • Perform periodic triage analysis on key systems and components
  • Strive to exceed PCI/DSS compliance standards, such as:
    • Segregate and segment your payment processing network from the rest of your network. Don't have your payment processing application running on the same system (and network) where your employees are checking Facebook
    • Change ALL software/hardware defaults, including application names and third party provider passwords. YOU should create a unique username/password for remote access if it is required. That reduces the chance of credentials reuse. DO NOT ONLY use simple dictionary words, your store name and number, etc.
    • Implement strong password policies and require password changes periodically
  • Look into freely available tools to help diagnose your current environment like:
    • noriben - A portable, simple, malware analysis sandbox
    • PEStudio - Static malware analysis tool
    • Online malware analysis services, such as anubis
    • Live Response collection - Allows gathering of volatile data from Windows, OSX, and *nix based systems


AUTHOR'S NOTE: Here is another good article from an author seems to be just as frustrated and shares similar opinions on this topic!


Automated Windows disk imaging? Sure, it can do that!

$
0
0


Hello again readers! After a busy couple of weeks, I had some time to work on adding a new feature to the Windows Live Response collection, automated disk imaging! This means that when you run the "Complete_Windows_Live_Response" batch file (with administrative privileges) that, on top of creating a memory dump and gathering volatile data from a system, it also attempts to identify all mounted drives on a system (excluding network shares) and if your destination drive has enough storage space, a forensic image of the drive will be created. It also will not allow you to create a disk image of a device when the destination is that device itself (in other words, you cannot run the script from a folder on your desktop and create a disk image. The memory dump will still occur, but disk imaging will not). And best of all, after each image is created, if you have more than one drive, the free space calculation runs again to try to ensure that the destination drive has enough free space available. Because of this new functionality, the Windows Collection also has three different scripts available:


"Complete_Windows_Live_Response.bat" must be run with Administrative privileges to work to the fullest extent possible. This script creates everything in the "Memory_Dump_Windows_Live_Response.bat" script, as well as creates full disk images of logical drives (except for network drives) on a device. This script must be run from an external device (or internally on a non-system partition) in order to create the physical disk image. The external device also must have more free space available than the size of the drive(s) that it is imaging (it checks prior to each image being created for free space). This is the ultimate "plug it in, run it, pick it up" option. The script can run without administrative privileges, however running the script with non-administrative privileges will not create the disk image or the memory dumps.


"Memory_Dump_Windows_Live_Response.bat" is the traditional Windows Live Response collection.  The script will automatically collect a memory dump and copy files of interest (such as Prefetch files) to the %computername% folder. It will also leverage hashdeep to compute the md5 and SHA256 hashes of Windows PE files located in the %WINDIR%\system32 folder and the %SystemDrive%/Temp folder (if it exists). It will also compute the md5 and SHA256 hash of every file, recursively, in the %TEMP% folder. It will also run netstat -anb, to provide results of services with open connections and it will also install winpcap, in order to run an nmap scan in an attempt to detect evidence of ARP poisoning. It needs elevated privileges to perform these functions, but it can be run without administrative privileges as well.  However, it will not return as in-depth of results as it would have if it were run with administrative privileges


"Triage_Live_Response.bat" is the "lite" version of the Windows Live Response collection. This gets rid of time consuming elements like the Memory Dump and WinAudit. It is still best to run this with administrative privileges, but it should work much faster and give an examiner quicker results than the other scripts.


In order to run the script, you should complete the following steps:


  • Step 1 - Download the Live Response collection
  • Step 2 - Unzip the Live Response collection to an external drive (I prefer USB3 hard drives larger than 1TB in size)
  • Step 3 - Navigate to the Windows Live Response folder on your external drive
  • Step 4 - Run "Complete_Windows_Live_Response"
  • Step 5 - Check back in a few hours, the image should be complete!


I made a short video using Snagit showing the above steps as well, which is embedded below:


I tried my best to make it as easy as possible to run as well as putting in as many checks as possible, within the batch script, to ensure that something bad would not happen. The update allows an incident responder, system administrator, help desk associate, non-IT savvy employee, etc. to be able to do an initial collection from a Windows system, as long as they have (at least) local administrative privileges. I built-in checks so that a disk image will not be created on the device that you are trying to image (you can do a memory dump still on a local machine, but disk imaging will not occur). It will also ignore the drive where you are running the script from, but if that drive has other partitions that are recognized, those will be imaged (please be aware of that and try to use drives with only one mounted partition as your destination).


I also had to debate whether to image the entire physical drive or just the logical drive. After going back and forth, I decided on the logical drive, for a couple of reasons. The first reason is that if we image the logical drive, we may indeed be missing some data, but if you utilize full disk encryption and we image the entire physical drive, more than likely we will have to decrypt that image at some point. This could add steps to the analysis process, so I tried my best to keep it as straight-forward as possible. The second reason is that with the physical drives, it will take into account multiple partitions on the internal drive. While this may be a catch-22 if you have multiple partitions on the destination drive, I decided to go that route to ensure if you have another volume mounted on your system (like TrueCrypt) that will get imaged as well.


You may also note that I added the GPL to this instance of the Live Response Collection. All of the tools included in the collection are available to use at no-cost, but I want to ensure that the work that went into making the scripts work and perform the automated memory dumps and disk imaging remains available to anyone who wants to use it. While I certainly hope that a company would not take the Live Response collection and attempt to monetize it, I felt that putting the GPL in there would be another step that I could take to try to ensure that monetization of the collection will not happen.


LiveResponse.zip - download here

md5: 8a34559b4c681fa37bf608187daf07d0
SHA256: 2791d029f16227c82af65ce658016fb758242cca46bf3aa4750cd2d0be1dceff


Upload Date: 16 October 2014


As always, any feedback is very welcome and if there are any features that you would like to see in a future update to the collection, please let me know! Happy automated disk imaging everyone!!


Part of an Afternoon with TrustPipe...

$
0
0

Today an article that sounded interesting was pointed out to me, regarding a company named TrustPipe that is claiming to catch 100% of network attacks. A direct quote from their website:

"Our patented technology understands the DNA 
of the Internet — what’s good and what’s bad.
It can detect virtually every attack — even the 
brand new "zero-day" ones — and protect you."

Naturally I was intrigued by this, although the cost of the tool (five dollars for five years) seemed to be awfully cheap, and I was a little surprised that the two options at the bottom of the screen are "Rest of World" and "Mainland China". 


My location options are "Rest of World" and "Mainland China". That seems a little odd.


When I did a Google search for the company, I came across their Twitter account which, since joining in 2011, as a total of one tweet. That also seems odd, especially for a company that does as much business at the article states.


Since February 2011, the company Twitter account has tweeted one time. Again, that seems odd to me.

At this point I was a little concerned, and I decided to use a very low limit credit card that I seldom use, just in case I had any more bad vibes after making the purchase. I paid the five dollar cost and received an email to download the tool. The instructions seem fairly straight-forward, and I downloaded the tool.


The download instructions after paying five dollars for TrustPipe


I transferred the file to my Malware Box of Evil and I ensured that I had .NET 3.5 installed prior to the installation, just like the instructions stated.

When I tried to install the program, I got an error message 1721 stating that there was a problem with the installation.


Error trying to install TrustPipe

I tried to install the application a few times before giving up. If there is an installation problem I would very much like to be told what the program that is needed would be, rather than a general error. I did a little bit of digging into the program with PEStudio and didn't see anything that jumped out at me as a warning flag, but then again, it is difficult to say without spending some time reverse engineering it, which I am not inclined to do at this point. The bottom line for me is that this product, which is supposed to be lightweight, easy to use, easy to install, etc. will not even install properly on the Malware Box of Evil, which is running Windows XP SP3. I don't see how a product geared towards specifically working on Windows XP cannot run/install properly on the box, but at least I am only out five dollars.


Their website is not very helpful and it does not have very much information, and browsing the LinkedIn profiles of their "Team" page on the website, it is hard to determine exactly who is employed by TrustPipe and who is not. I would love to hear from anyone who has actually used the product and am curious on their results with it. I was looking forward to testing some POS malware with TrustPipe running to see how it would fare, but due to the installation problems I don't even recommend getting the application for testing purposes. I also immediately called up my credit card company and cancelled the card that I made the purchase with. With the bad vibes that I felt going through the initial checkout process, I felt that it was best to cancel the card and request a new one, just in case.


Even More Live Response Collection Updates!!

$
0
0


Hello again readers! The last update to the Live Response collection was about two months ago, and I have been working on adding more open-source tools and data collection processes to the collection. I also tried to enhance the way that the Windows Live Response collection operates, including building in some file/location existence checking in an effort to ensure compatibility with newer version of Windows, including some initial attempts at gathering data from Windows 10, with many thanks going to Brad Garnett for doing testing on these newer versions.


While a majority of the changes are going to be transparent to the end user, the processing of some items, like Sysinternals, has greatly changed. It also leverages a couple of really powerful tools to copy files, such as Registry Hives, $MFT, $LogFile, $UsnJrnl, and Event Logs from Windows systems. In a blog post in about a month ago Corey Harrell pointed out an awesome tool from Joakim Schicht that allows the extraction of the $UsnJrnl that not only copies it from a system, it also only extracts "used" data, which usually results in a very great reduction in size. To quote Joakim: 

"This may be a significant portion of the total data, and most tools will extract this data stream to its full size (which is annoying and a huge waste of disk space). This is where this tools comes in, as it only extract the actual data for the change journal. That way extraction obviously also goes faster. Why extract 20 GB when you might only need 200 MB?" 


The script also now leverages another great data extraction tool, forecopy_handy. By using this tool, it also allows copying of in-use files such as Registry Hives, Event Logs, and browser related files from a live system. If you create a disk image using the "Complete" version of the script it is likely that you will get access to these files, but this method allows you to take the files prior to (or instead of!) creating a disk image if you would like.


There are also many changes to the overall processing performed by the script, for example, before the script would delete the entire Registry folder related to Sysinternals, but Luca Pugliese pointed out that in some investigations you may very well be looking for when Sysinternals was installed on the system, and that method could very well wipe out evidence (which could potentially be a bad thing). The script now checks for evidence of Registry Keys related to the Sysinternals programs that the script requires. If it finds them, it updates the value to "1" (to ensure the tool will run without user interaction) and that is the only change that is made. If the key is not found, it will populate the required Registry keys, but it will still clean up after itself. 


Extracting the $MFT, $LogFile, and $UsnJrnl had always been in my plans (especially if you use the TriForce tool) but I just hadn't had the time to work on the updates until the past week or so.


Please do not hesitate to reach out if there are any items that you commonly use during the course of an investigation that the script does not currently extract, and hopefully it can be included in the next release. For example, some of the requests for data collection from Windows are:


  • Automatically encrypting the output of the script (volatile data collection, memory, and disk image)
  • More browser history related file extraction
  • Log file collection (IIS logs, AV logs, application logs, etc.)
  • Data collection/file hashing for all users (not just current)


I am hopeful that the next release will cover most, if not all, of the requests. I am also hopeful that automated Mac memory collection and drive imaging will be included in the next update (fingers crossed!)


LiveResponse.zip - download here

md5: 8a34559b4c681fa37bf608187daf07d0
SHA256: 2791d029f16227c82af65ce658016fb758242cca46bf3aa4750cd2d0be1dceff


Upload Date: 08 December 2014


GUI, Logging, Compression, and Encryption -- Updates to the Live Response Collection!

$
0
0


Hello again readers! Over the past few weeks, in between cases, I have been hard at work trying to get a couple of new features implemented into the Windows Live Response Collection. Today I am very happy to announce those changes are ready to be publicly released!

Change 1: A GUI

The first change that you may notice is in the Windows folder, there is now an executable file named "Windows Live Response Collection.exe". When you run this executable (which asks to run Administrative privileges), you are presented with *gasp* a GUI that allows you to choose between a total of six options: Secure-Complete, Secure-Memory Dump, Secure-Triage, Complete, Memory Dump, and Triage. There are two main reasons for the GUI, the first being that if you need to collect data from a system with a touchscreen (like a POS system) you no longer need a keyboard and/or mouse to do so. The second is, quite honestly, most people are more comfortable with a GUI.


The Windows Live Response Collection now has a GUI!!


Change 2: "Secure" options

There is a brief description of each option next to your choice, but the most notable change in this release are the "Secure" options. If you choose one of these options, upon completion of the data gathering, the output is compressed and encrypted using 7-zip with a one-time, randomly generated 16-character password. Once this occurs, the original data is deleted using SDelete (this runs up to 10 times). In my testing I was able to recover a couple of file names, but none of the actual data. Choosing one of the "secure" options allows you to collect data from various systems. This way if the drive ends up in the wrong hands, you can feel fairly confident that the collected data cannot be opened. This additional layer of security will be useful in cases where drives have to be transported or mailed.


You are prompted a few times to ensure that you copy the password, because if you do not, short of brute-forcing the password, there is no way to open the 7zip file. So, I cannot stress this enough, if you use one of the "Secure" options, please make sure that you copy the password and never save them on the same drive as the data.


Change 3: Logging options

The Windows Live Response Collection now has automatic command error/processing logging, which is cleverly stored in the "Processing_Details" text file. For ease of looking through the files, "File_Hashes" is now stored separately as well. 


File_Hashes and Processing_Details in the folder


Example of data contained in Processing_Details file


All six of the options have their very own batch script, so you can still choose to run the batch script if you would like. Also, for your convenience and customization options, the GUI is simply an .hta (html application) that essentially acts as a wrapper around the batch scripts. So as long as you do not rename the batch scripts themselves, you can still edit the batch scripts and the GUI will still run them. However, please note that if you customize it I cannot guarantee that the script will run properly, so please ensure you have an understanding of the batch scripting language and the changes/functionality that you want to add prior to running it through the GUI. 


LiveResponse.zip - download here

md5: ee39cbb201b46346b6a136701caf1088
SHA256: 7bc8114536b47845b89aee9df96abb6cd0896209c414ee2e5ee3685a29b27037


Upload Date: 30 January 2015


Other Live Response options worth noting


The fine folks over at Yelp put together (and more importantly, publicly released) an OSX collection script that is built primarily for their environment, but it performs a few functions, such as LSQuarantine parsing, that my OSX collection script does not. I highly encourage you to check it out, if you have not done so already!

Blog post

OSXCollector on GitHub


CrowdStrike also announced an update to their Crowd Response tool, which delves into some Superfetch data. I have not had a chance to test it out that much, but please be aware their tool requires PowerShell, which (in my experience) is not installed on many POS terminals, which is one of the primary platforms that I built the Live Response collection for. 

Crowd Response blog post 


Beside these options, there are many other tools that you can use for gathering volatile data from systems, (Corey Harrell's Tr3secure script is one that I highly recommend checking out if you have not already). I compiled the Live Response Collection primarily to gather data from systems that I primarily deal with, which will end up saving my clients costs associated with travel and on-site analysis, but please remember that different tools are written with different functions and different end users in mind. 


A (new) way to consider getting data from mobile phones

$
0
0


Hello again readers! Today's post is possible as the result of a joint collaboration with Berla (https://berla.co/) in an effort not only to give some exposure to the very interesting and exciting world of vehicle forensics, but also to show how data stored on a vehicle can be an additional medium from which you can recover information, especially when you encounter devices for which no method exists. In fact, you can recover mobile phone data from vehicles that the device has synced to in the past, even if the device is not currently synced with the car! This post covers only a very, very small subset of the amount of data that can be recovered using the tools and techniques employed by Berla.


The subject of this post is a typical user, who employs pretty good overall security practices and owns a Samsung Galaxy Note II. This particular device is password protected, the encryption option for both the phone and the SD card are turned on, and USB debugging mode is turned off. Using a standard mobile device forensic solution, such as Cellebrite UFED, and trying a variety of different methods of extraction yields no results. This means that the data that is stored on this phone is not accessible through traditional methods. 


Galaxy Note II - Physical Extraction Attempt


Downloading... (or at least that is what it says!)


Extraction in progress...(or at least that is what it says)

First Extraction Error


Logical extraction attempt


Extraction in progress. Part II


Another extraction error. Foiled again!!


I verified that USB debugging is not on


It is passcode protected too. Curses!!


The steps that this user took to protect their device are fairly standard and easy to accomplish, especially if the user follows some basic mobile device security best practices. However, this particular user also has a lot of music stored on their device (for long commutes, subway rides, and general time passing) and, on a regular basis, syncs the device to their automobile (in this case, a uConnect system from a 2014 Fiat 500L). This is where Berla and the iVe Vehicle System Forensics can come into play and, quite honestly, may be the only source of mobile device data that you can collect.


The folks at Berla were nice enough to set up the uConnect as well as give me a quick run through of the iVe program. If you've had any experience dealing with mobile devices, the steps are going to be kind of similar, with helpful techniques and procedures (and even videos!) built-in to the iVe program to help make your vehicle data extraction go as smoothly as possible. For ease of convenience, in this case we used a uConnect 6.5/RA3 and I connected my phone over Bluetooth. (NOTE: There will be a future post about the data pulled after a USB connection, as well as posts regarding different vehicle systems and the amount of data that can be extracted from them). The Chrysler brand uses various versions of the uConnect in their family of vehicles.


First we powered on the uConnect and turned on Bluetooth on the Galaxy Note II and started the sync processes.


uConnect

Bluetooth syncing with uConnect

Successful sync!


uConnect prompt requesting access to contacts and call history

Not only can you now see my contacts and call history, you can also see up to the last 16 text messages visible on the device that were received prior to syncing with the uConnect (it is a feature, not a bug!) plus all additional messages that are received while the device is synced and connected via Bluetooth. I included a couple of screenshots from the uConnect showing this data (personal contact information removed, with the exception of a telemarketer call)


uConnect recent calls

SMS (not MMS, and only the last 16)

All contacts
(NOTE: I would like to stress again that it may very well be possible to get more data from a USB sync. Since it requires some more setup that is planned for a future post)


Once that was done, it was time to fire up iVe and extract the data from the uConnect. I cannot stress how easy Berla has made this process. It's very simple, just point, click, fill in the fields, and run the tool.


iVe Forensics GUI

Choosing the vehicle and target systems. Guides and videos are included to help you through this process if needed.

I always want as much data as possible, but partial (user data only) is also an option and is much faster.

Everything looks good, ready to rock!

Case information entered just before acquisition, just in case something in the setup process goes wrong!

And it begins!


One of the many great things about iVe is, on top of extracting data from a vehicle, is it also presents the data in a nice, simple format. Thus far it seems like a majority of the files have been SQLite databases. iVe goes a step farther and does some parsing of the data and puts it in a nice, easy to read format so even if your SQLite skills are not up to the challenge, the program can show you data such as Address Book entries, SMS, and Call History. 


Overview of data gathered by iVe (look at all of the synced devices!)


iVe parsed SMS (including panda emoticons!)


Call logs from device

Address book from device

You can export the data, if you so desire!

I also included a screenshot showing the SQLite database file "pm7000033.dbf" which, in this case, contains the SMS messages. I believe the name of the file and the path that it is under may vary, depending on the vehicle (more testing is needed for that, I didn't think to ask the question today during our extractions)


Hex Workshop and Windows Explorer view of "pm7000033.dbf", which is a SQLite database containing the SMS data from the uConnect


(NOTE: The uConnect seems to have a built-in feature that automatically powers off if running from a battery alone for more than 15 minutes. This should only happen if the uConnect has been removed from a vehicle and is set up in a lab/workbench environment. This may come into play if the vehicle has been in an accident and you must remove the uConnect from the vehicle in order to extract data from it. It took four tries (thus the name Try4) to get the full acquisition, as it took about 23 minutes. Fortunately on the last attempt I was able to hit the power button in time and keep it on before it powered off. If you are doing performing a uConnect data extraction from inside a vehicle, you should not encounter this because the uConnect will be in auxiliary mode.)


If it were not for iVe, we would have not gotten any data associated with this particular mobile device. Thanks to iVe, we managed to get a total of 1521 Address Book entries, 18 SMS, 86 call events that were associated with the device. It is definitely something to keep in mind if you are faced with a mobile device that you cannot extract data from!


There is one more key area that I would like to address, which is the protection of data that is important to you and your company. Let's imagine a scenario where you are a C-level executive working for Galactic Empire, Inc. and you fly from New York to Los Angeles in order to meet with some business representatives regarding very sensitive plans for a new Death Star you are building. There have been many text messages between you and other senior level executives with details on your secretive project. Since you have been with Galactic Empire, Inc. for many years, you have a lot of music (like the Imperial March) on your company-owned mobile device that you want to play during your drive from LAX to your hotel, so you sync your device with your rental vehicle for easier playback. Simply playing music seems innocuous, and despite prompts saying the device wants to access your information, you choose to anyway because it is "just a car". However, there is a very good probability that you also just synced your address book, call history, and (at least some) SMS messages with the vehicle. All a competitor (or security researcher, hacker, or other malicious actor) has to do is gain access to the data stored within the vehicle and they will be able to potentially gain access to much more information than just the music that you thought you synced, even if your mobile device is no longer present in the vehicle. Mobile device syncing with vehicles is yet another factor that businesses should consider in their risk analysis assessments of cyber security.


Gone Phishing

$
0
0

Hello again readers! Today's blog post deals with a phishing email that was sent to my Yahoo! email address that I received two days ago, allegedly from DHL. Interestingly enough the Symantec web filtering that Yahoo! uses did not block the attachment. As you can see, it is purposefully misnamed a few times. I cannot speak to the implementation of Symantec that Yahoo! uses, but I would love to know more about how it works if anyone has a contact at Yahoo!


The email came from the Display Name "sales company", and was titled "from DHL customer service". The file contained an attachment "[DHL Express tracking] (1).pdf-3.zip" (md5: 86915fae2dd82e039aab70c64ff1f5ef) (SHA256: 109f10822f89acf1a70665d7628173bc9c58c6f4d327bdbd0ca368e675f965c9). Maybe you were expecting a shipment from DHL, so maybe this email would not seem out of the ordinary to you. Hopefully the fact that the file has both a .PDF and .ZIP file extension raised a flag of caution and you recognized this as phishing, but let's proceed as if nothing odd was noticed. 


Original email, purportedly from "DHL". I believe the Norton/Symantec logo means the attachment was checked and passed a test, but not exactly sure what that test entails


Looking at the full header, we see that the email was sent from the email address "sales.pyarra89@hotmail.com". I am pretty sure that an organization such as DHL would not use a Hotmail account to send tracking information, but once again, let us continue down the analysis path.


Email header of the DHL email


When we download the file, we can see that it is indeed not a PDF, but it is actually a .zip file. It also looks like it will create an .html file when we unzip it, which is exactly what happens.


Hex Workshop view of [DHL Express tracking] (1).pdf-3.zip


Unzipped file, now named "[DHL Express tracking] (1).pdf.html"


When opening the web page, we are presented with yet another classic sign of attempted phishing, a "DHL" webpage that requests your email address and password. Hopefully this is alarming enough and you do not put in any information.


This is the web page that is displayed when you open the html file 

Now that we have a web page, let's explore the formatting of it a bit. The icons for various email providers at the bottom are odd (why is "eBay" there?), especially on what is supposed to be a legitimate DHL page. Additionally, does any legitimate web page use Comic Sans MS font? 


When we look at the file in a text editor, we can see that the email address and password are required. We can also see that the page has an ironic meta tag, and the actual domain where your email address and password will be sent to.


Viewing "[DHL Express tracking] (1).pdf.html" in Notepad++


Just for fun, I entered the email address example777@domain.com and the password "password" into the text box. 

Fake email address and password


Unfortunately after entering my "email address" and "password", I was redirected to the DHL home page. I had hoped the creators of this phishing email would have at least displayed a message stating "We are sorry, we cannot find your package in our database" or something similar, but all that happened was a basic redirect to the real, legitimate DHL home page. 


After all that, a simple redirect to DHL. Darn!


The moral of this blog post is to be wary of phishing email attempts. Most companies will never ask for your email address or password with regards to looking up information, especially in an unsolicited like this. Be sure to watch out for things like misspellings, odd looking icons, mismatched file extensions, and files with multiple extensions ("shipping.exe.doc.pdf.zip.scr"). If you feel that you are unsure about an email, ask a member of your IT or information security staff. Also do not hesitate to reach out to the "sender" of the email directly with a phone call, to make sure that it is legitimate. 


If you would like to look at the file, I just uploaded it to virusshare.com (might take a little while to process) as well as submitting it to VirusTotal (5/57 detections).


And you get a POS malware name...and you get a POS malware name....and you get a POS malware name....

$
0
0


This morning I woke up to find Trend Micro/Trend Labs had a new post on an "old undetected PoS malware" which they have called "PwnPOS". I was interested at first, but this looks like just another case of randomly assigning names to malware and/or threat actors. Unfortunately for the folks at Trend, who usually put out pretty good work, the scraper in question (which is an executable file that I have personally seen with many names, but we will refer to it as "wnhelp.exe") is old. Very, very old. In fact, the date/time stamp embedded into the file itself is from 2010.


wnhelp as seen in PEStudio 8.46

The scraper is very basic, it looks through memory looking for Track data, and when it finds matching data, it saves it to a file "perfb419.dat" which is under the Windows/System32 folder. There are sometimes legitimate files with similar names under this path, no doubt it was an effort for the attackers to try to make the data blend in. 


Example of "track" data collected in perfb419.dat. 


The scraper itself does not have an active exfiltration mechanism, so either an additional file(s) is needed to exfil the collected data or the attacker(s) can remotely access the system and send the file out (email, ftp, file sharing site, etc). wnhelp uses a "service" persistence mechanism in order to stay running on the machine, so looking at just CurrentVersion/Run in the Registry will not allow you to detect the file. The service is named "Windows Media Help", and the information that is collected from the Live Response Collection using SysInternals autorunsc is listed below:


wnhelp embedded under the "Windows Media Help" service


The exfiltration methods listed in the Trend article "might" be new, but I cannot be certain as I personally do not have access to those files (yet, I am working on that). I am leery of how new these files may be though, simply based on the liberties that Trend appears to have taken with the original wnhelp file. Additionally, of all the files listed in the Trend post, the most recent compile time is listed as 2012, with most of the compile times dating back to 2010. None of these files appear to be "new" at all. 


Not "new" or "under the radar"


Back in 2013, the wnhelp sample was uploaded to malwr, among other sites, to use their automated malware analysis tool


malwr results from 2013


Additionally, a Google search for the md5 hash (c86327222d873fb4e12900a5cadcb849) shows that, at the very least, a user of the domain "systemexplorer.net" posed a question about wnhelp back in 2012. I did not dig through all of the results, but 83 search results, with several entries on the first page relating to "malware" in one form or another, is hardly flying "under the radar".


systemexplorer.net query of wnhelp from 2012


In the Trend post, the author stated "PwnPOS is one of those perfect examples of malware that’s able to fly under the radar all these years". As you can see from just the examples that are listed above, that statement is simply not true. It does highlight the importance of understanding "what" is running within your POS environment. It also highlights the fact of regularly checking systems within your POS environment to make sure that they are running properly and there is nothing "else" (malicious or otherwise) running on those systems.


Several month ago I came across a domain that was hosting this (and other) samples of POS malware. I collected all of the samples and files on the domain. The owners of the domain let the registration lapse a few months ago, at which time I purchased it and re-directed it to "fbi.gov" (my own way of "getting back" at bad actors). If you are interested please feel free to contact me, I will share some of the files with you (I cannot share them all, as some of the files contained information that I legally cannot share).


Telsacrypt vs open source tools

$
0
0


Hello again readers! Today's blog post is going to cover a new "variant" of ransomware that has been deemed "Teslacrypt", which was highlighted in a fairly detailed post by Vadim Kotov from Bromium Labs.  I was able to acquire two samples of Telsacrypt, which I affectionately labeled "teslacrypt.exe" and "teslacrypt2.exe".  There really isn't anything earth-shattering or groundbreaking that this ransomware does, but this blog post will highlight how you can leverage open source tools such as noriben, PE Studio, and the Live Response Collection to triage a system that has been affected with this ransomware and some tips and techniques that I picked up during my research that may help you in dealing with this (and other) forms of ransomware.


Although teslacrypt.exe and teslacrypt2.exe both performed the ransomware process in similar fashions, there were differences between both of them, primarily in the content of the actual executables themselves and the persistence mechanism that each used. For the purposes of this post, I will highlight the differences, but will refer to traits that the files share as "teslacrypt" with specific details of "teslacrypt.exe" and "teslacrypt2.exe" as needed. Both executables are available on VirusShare if you would like to dig into them on your own!


"teslacrypt.exe"
(md5: 209a288c68207d57e0ce6e60ebf60729)
(sha256: 3372c1edab46837f1e973164fa2d726c5c5e17bcb888828ccd7c4dfcc234a370)


"teslacrypt2.exe"
(md5: 81f44c27c1c765890384095fe6f5f8bf)
(sha256: 3129c794296d54606d9f1771672250ee57b798ce6f9ab8335d677f48e552ae80)


FIGHT!

First of all, I want to point out that since the last time that I mentioned noriben in a blog post, Brian Baskin has put out an update that adds some cool new features to the noriben tool. While the Malware Box of Evil is a stand-alone machine with no external network connections, I did learn a new way to leverage the awesomeness of noriben when issues arise (as you will soon see).


noriben ran on the system just fine, however this ransomware also encrypts (among many other types of files which I will cover under the "PE Studio" section), files that end with a .py (Python script) extension. Although the malware continues to run after it is started, it only appears to actually survey the system for the files to encrypt one time when it initially runs until the Ransomware windows pops up and, and then again after the system is rebooted (as evidenced by the persistence key in the Registry which I will cover in the Live Response Collection section). What this means is that although noriben itself was running, the actual script was encrypted by the ransomware, so the additional processing of the Process Monitor Log file (.pml) was not able to occur on the system itself.


Python scripts encrypted by Telsacrypt (note .ecc file extension). I saved "Noriben-1.6.1.py" after the ransomware noticed popped up, to test to see if it would be encrypted again (it was not)


Fortunately, noriben can process the .pml file after it is collected, which is what I ended up having to do.


 I copied the .pml file over to my admin laptop and ran it from the command line with the "-p" flag. This processed the pml file and generated the csv, report, and timeline files as was expected on the Malware Box of Evil.


Running noriben from another system to process the .pml file


As noriben demonstrated, running "teslacrypt2.exe" spawns a new executable "ovsbhpa.exe" which is stored in the %AppData% folder, which in this case, the full path is "C:\Documents and Settings\Administrator\Application Data\ovsbhpa.exe". The executable then deletes itself from the original location. The first thing that the new executable does is runs vssadmin to delete all shadow copies on the system, thereby likely eliminating the possibility of restoring from a backup that was contained on the system.


The processes created by Teslacrypt2, as seen with noriben

Telsacrypt creates two additional files in the %AppData% folder, "key.dat" and "log.html". The "log.html" file fairly straightforward, as it is a file that contains the listing of every file that was encrypted by teslacrypt. 


contents of "log.html"

The file "key.dat" is more interesting, as the first portion of the file contains the "Bitcoin address" (a string of characters that is Base-58 encoded) that is supposed to allow access to site in order to decrypt your files. 


teslacrypt popup window on the infected Malware Box of Evil


Interestingly enough, the "key.dat" file for both teslacrypt.exe and teslacrypt2.exe follow the same structure, but the file created by "teslacrypt2.exe" has an additional twelve bytes of data at the very end of the file. The file size of "key.dat" that was generated by teslacrypt.exe was 636 bytes. The file size of "key.dat" that was generated by teslacrypt2.exe was 648 bytes. The difference between these two versions is something that I hope to explore more in the coming weeks.


Comparing the contents of "key.dat" generated by "teslacrypt.exe" and "teslacrypt2.exe". Note the additional 12 bytes associated with the file generated by teslacrypt2.exe


The original file(s) that Teslacrypt searches for (based on file extension) appear to be encrypted, the file name is created, and then renamed with the .ecc file extension. Although this appears to be fairly benign in nature, the way that this occurs means that there is no way to recover the contents of the actual file(s) through traditional data recovery methods. I have some more digging to do through the disk image that is going to take more time, but my initial take is that there is indeed no "easy" way to recover the data from within the encrypted files.


Teslacrypt (ovsbhpa.exe) in action


PE Studio

Marc Ochsenmeier released a new version of PE Studio, 8.47, earlier this month. I took a look at both the teslacrypt.exe and teslacrypt2.exe executable files in PE Studio. telsacrypt.exe was the more "basic" of the malware, as it contained many strings that were noteworthy during the static analysis phase. It was also a few weeks older than "teslacrypt2.exe".


"teslacrypt.exe" (md5: 209a288c68207d57e0ce6e60ebf60729)
(sha256: 3372c1edab46837f1e973164fa2d726c5c5e17bcb888828ccd7c4dfcc234a370)


teslacrypt.exe file information, as seen in PE Studio 8.47


teslacrypt.exe file header, as seen in PE Studio 8.47


teslacrypt.exe indicators, as seen in PE Studio 8.47


teslacrypt.exe blacklisted strings, as seen in PE Studio 8.47


"teslacrypt2.exe" (md5: 81f44c27c1c765890384095fe6f5f8bf)
(sha256: 3129c794296d54606d9f1771672250ee57b798ce6f9ab8335d677f48e552ae80)


teslacrypt2.exe file information, as seen in PE Studio 8.47


teslacrypt2.exe file header, as seen in PE Studio 8.47


teslacrypt2.exe indicators, as seen in PE Studio 8.47


teslacrypt2.exe blacklisted strings, as seen in PE Studio 8.47


Live Response Collection

I used the "Complete" option of the Live Response Collection so I would have a memory dump, system information, and a full disk image of the system each time it was infected. I was also curious to see exactly "what" persistence mechanism was used for both variants of teslacrypt.exe. The memory dump and disk image portion will be saved for a future post (when I have more time to do some deep dive analysis) and quite honestly, the memory dump itself will probably have it's own blog post. For the purposes of this blog post, we will focus on the persistence mechanism used by each variant.


"teslacrypt.exe" (md5: 209a288c68207d57e0ce6e60ebf60729)
(sha256: 3372c1edab46837f1e973164fa2d726c5c5e17bcb888828ccd7c4dfcc234a370)


A key is created in the NTUSER.dat hive of the currently logged on user, under the path "Software\Microsoft\Windows\CurrentVersion\Run". This is a commonly used key for persistence; however, if another user was to log on the system, teslacrypt would likely not run. The name associated with this entry is "crypto13".


teslacrypt.exe persistence mechanism, as seen in autorusc.txt


"teslacrypt2.exe" (md5: 81f44c27c1c765890384095fe6f5f8bf)
(sha256: 3129c794296d54606d9f1771672250ee57b798ce6f9ab8335d677f48e552ae80)


A key is created in the SOFTWARE hive on the system, under the path "Software\Microsoft\Windows\CurrentVersion\Run". Unlike the "teslacrypt.exe" variant, this persistence mechanism affects the entire machine, not just the currently logged on user, which enables system wide persistence, rather than persistence based on a particular user.. The name associated with this entry is "svcav_module". This is likely an effort by the author(s) to try to make it blend in a little bit more on the system.

teslacrypt2.exe persistence mechanism, as seen in autorusc.txt


EXTRA BONUS!!

This blog post is already very long, but I wanted to include a plain-text listing of all of the file extensions that teslacrypt seems to target. This was taken directly from the original version; however, my initial research is that both files target the exact same file extensions. I put the file extension in descending order, for ease of browsing convenience.


.001
.3fr
.7z
.accdb
.ai
.apk
.arch00
.arw
.asset
.avi
.bar
.bay
.bc6
.bc7
.big
.bik
.bkf
.bkp
.blob
.bsa
.cas
.cdr
.cer
.cfr
.cr2
.crt
.crw
.css
.csv
.d3dbsp
.das
.DayZProfile
.dazip
.db0
.dbfv
.dcr
.der
.desc
.dmp
.dng
.doc
.docm
.docx
.dwg
.dxg
.epk
.eps
.erf
.esm
.ff
.flv
.forge
.fos
.fpk
.fsh
.gdb
.gho
.hkdb
.hkx
.hplg
.hvpl
.ibank
.icxs
.indd
.itdb
.itl
.itm
.iwd
.iwi
.jpe
.jpeg
.jpg
.js
.kdb
.kdc
.kf
.layout
.lbf
.litemod
.lrf
.ltx
.lvl
.m2
.m3u
.m4a
.map
.mcgame
.mcmeta
.mdb
.mdbackup
.mddata
.mdf
.mef
.menu
.mlx
.mpqge
.mrwref
.ncf
.nrw
.ntl
.odb
.odc
.odm
.odp
.ods
.odt
.orf
.p12
.p7b
.p7c
.pak
.pdd
.pdf
.pef
.pem
.pfx
.pkpass
.png
.ppt
.pptm
.pptx
.psd
.psk
.pst
.ptx
.py
.qdf
.qic
.r3d
.raf
.rar
.raw
.rb
.re4
.rgss3a
.rim
.rofl
.rtf
.rw2
.rwl
.sav
.sb
.sc2save
.sid
.sidd
.sidn
.sie
.sis
.slm
.snx
.sr2
.srf
.srw
.sum
.svg
.syncdb
.t12
.t13
.tax
.tor
.txt
.unity3d
.upk
.vdf
.vfs0
.vpk
.vpp_pc
.vtf
.w3x
.wb2
.wma
.wmo
.wmv
.wotreplay
.wpd
.wps
.x3f
.xf
.xlk
.xls
.xlsb
.xlsm
.xlsx
.xxx
.ztmp


Live Response Collection slides from Bsides Charm

$
0
0


Hello again readers! I had the pleasure of speaking about the Live Response Collection at the inaugural Bsides Charm event held this past weekend. I am working on getting some new features and functionality added to the next release which I hope to have available in the near future. As always, if you have any suggestions or comments to help improve the functionality or additional data that you would like to see collected, please do not hesitate to contact me!


http://www.slideshare.net/BriMorLabs/live-response-collection-overview


Post OPM Breach...let the phishing begin!!

$
0
0


Hello again readers! As you may already know, last evening the Office of Personnel Management (OPM) admitted they sustained a data breach where they "lost 4 million records". In reality the number is probably much higher than that and the attack probably did not actually possess a "never before seen level of sophistication" or use a "previously unknown zero day attack" or any of the other "it is not our fault" mumbo jumbo that is usually seen after a data breach is admitted publicly. 


However, this blog post is not going to cover any of that, instead it is going to focus on two phishing emails I received last night that were possibly related to my own information being compromised in the breach, as my personal information is held by OPM as I was in the DoD (as a member of the US Air Force) and still currently hold a security clearance. (NOTE: I have not been notified that any of my information was compromised, and it could be completely unrelated. But...I mean....come on)


The phishing starts....

Last night I received two phishing emails that were related to "my Navy Federal Credit Union account". This is interesting because although I have indeed served in the military, I do not have any accounts with Navy Federal Credit Union at all. 


Two emails received from "Navy Federal"


The first email was received at 19:05:07 and the second was received at 19:53:17, so in less than an hour I had two phishing attempts. Once again, I cannot definitively say that it is related to the OPM breach, but the timing is suspect, to say the least.


Email 1: Your Account Statements is Now Avaliable

This was the first email that I received, with typical spelling errors and grammatical mistakes. As I have stated many times in the past, a "sophisticated" phishing email is one with no misspelled words or grammatical errors. This is clearly NOT in the sophisticated category. The link redirects to the domain "http://rudivervoort[.]be/SP/", which clearly does not seem to be legitimate for the Navy Federal Credit Union website. The email address is listed as "navyfederal@usmc.com", which is also NOT the domain of Navy Federal Credit Union. UPDATE: The url in the email is now listed on virustotal as well!


Original email

Email with some grammar and spelling issues highlighted

Email header information

VirusTotal results from link in email


Email 2: Account Review Notice!

This email was sent later and is crafted a little bit better than the first. There are no spelling errors, although there are quite a few grammatical errors. Analysis of the email header shows it "originated" in the same Canadian IP addresses as the first phishing email, which may suggest they were related. The redirect link is a shortened URL, which should not happen in a legitimate email from your banking institution. In fact, the URL is shown on VirusTotal as malicious (already!). The email address this time around is listed as "Nfcu_navyfederal@net2.com". The first email address, in my opinion, was better.


Original email


Grammar highlighted

Email header information

VirusTotal results on link in email


Regardless of whether these emails are actually related to the OPM breach or not, it does highlight the importance of taking some safety precautions to avoid falling for phishing emails: 


  • Always ensure you read an email thoroughly. Look out for spelling and grammar issues; if it seems strange, it probably is
  • Hover over links before clicking on them
  • Better yet, do not click on ANY link from your bank, credit card company, shipping company, etc. Log into the website of your service provider directly if you get an "important message" from them


A very timely Dilbert comic strip. Retrieved June 5, 2015 from http://dilbert.com/strip/2005-08-12


How to Have that Awkward Conversation

$
0
0


Hello again readers!! Today's post is the first (but most certainly not the last) "guest post" in which friends and colleagues can share their experiences and insights and give alternate perspectives on digital forensics, incident response, and information security. 

Today's post is authored by my friend "Jack" who has much more experience (and an MBA) on the "business" side of forensics and incident response than I ever will (and let's be honest, I also will never have an MBA). "Jack" may or may not also be in the Witness Protection Program, but the OPM data breach might change that.....

(PS: Apparently cat memes are the number one attraction to blog posts, according to 87 out of 100 business professionals. The other 13 were no doubt scouring the internet for other pictures of cats.)


How to Have that Awkward Conversation

By: "Jack"


NO, not the “It’s not you; it’s me!” one.  The one where you tell your employees (or clients!) that you’ve been hacked, their information is who-knows-where, and oh by the way, you’ve got no idea how the bad guys even got in.  You know. THAT one.  

I’m not going to sugarcoat this.  It’s going to be painful.  It’s going to be embarrassing.  But just like adults always tell kids, it is better to hear it directly from you.   If the news media or banking institutions are notifying victims instead… oh boy; it’s a public relations nightmare.  

First rule of Data Breach Club: Talk first and say it loud.  No one likes being indoctrinated into Data Breach Club, but I’ll let you in on a little secret:  It’s not an exclusive membership.  You’re either in the club, or you don’t know you’re already in the club.    


If you are upfront and honest, chances are better that you might maintain the relationships your organization has with its employees, partners, and clients.  Further, you may not have a choice about public disclosure, or private disclosure, depending on contracts you have with clients.  Depending on the laws where you operate, you may be obligated to provide full disclosure within a certain time period.  Most state breach notification laws don’t specify what your notification should include; however there are some minimum guidelines which we attempt to cover in our samples below.   

In the State of Maryland for example, the Attorney General’s website says the following about data breach notifications:


Once a security breach is detected, a business must conduct in good-faith a reasonable and prompt investigation to determine whether the information that has been compromised has been or is likely to be misused, i.e. for identity theft. If the investigation shows that there is a reasonable chance that the data will be misused, that business must notify the affected consumers. 
In the event of a security breach, notice must be given to consumers as soon as reasonably practicable following the investigation. A business may delay notification if requested by a law enforcement agency or to determine the scope of the breach, identify all the affected individuals or restore the integrity of the system. Notice to affected consumer must be given in writing and sent to the most recent address of the individual, or by telephone to the most recent phone number. Notice may be sent via e-mail if an individual has already consented to receive electronic notice or the business primarily conducts its business via the Internet. The law also contains a provision for substitute notice, allowing a business to provide notice of a security breach by e-mail, posting on its website and notice to statewide media if the cost of notice would exceed $100,000 or the number of consumers to be notified exceeds 175,000 individuals.  (https://www.oag.state.md.us/idtheft/businessGL.htm)

Searching online for “data breach disclosure laws AND [your location]” should net you some relevant results.  When in doubt, call a lawyer that specializes in data breaches.  If the Google can’t find one, your local Bar Association should be able to assist you.  


So how do you begin that notification email?  Your letter should contain some version of the following:
[ ] denote areas where you should fill in the blank


Part I—Introduce the Problem and Accept Responsibility:  You need to be upfront and honest; if you have a lawyer advising differently, find a new lawyer (Preferably one you suspect has a secret identity and fights crime at night using heightened senses resultant from a hazardous chemical spill; but I suppose if you can’t find one, any ethical data breach lawyer will do.)  If you don’t know something, say so.  Trying to hide the fact that you don’t know something just makes you look like you are hiding something, which is usually assumed to be more sinister.  Also, please don’t place blame on nation-states for a mess of your own creation; you’ll end up looking ridiculous and becoming the Poster Child of “What NOT to do”.        

“We are contacting you because on [insert discovery date] we discovered a serious cyber-security incident that occurred between [Start Date] and [End Date] that involved a breach of your [personal information, such as medical records, credit card numbers, passwords, etc…].  At this time we do not believe that [other personal information] was accessed.  We know you have trusted us with your information and we take that trust seriously. We take full responsibility for this incident and we will work tirelessly to resolve it quickly and completely.”

And if you delayed in sending notifications to victims, say why:

“In accordance with applicable laws, we delayed notification of affected parties by 30 days, due to an official request by law enforcement.”


Part II—Here’s What Is Happening Now:  This is where you tell them what you are doing do fix this problem.  (Not diverting attention, not doing just enough to get regulators off your back, not putting on a show to restore stock prices, not doing the minimum for regulatory compliance or limiting your liability.  Actually fixing the problem.  Let me say it again for dramatic effect:  Actually.Fixing.The.Problem.)  


You’ll want to (or be required to) at least cover what you did to stop the attackers, what you are doing to clean-up the breach, and what changes you will make in the future.  Your notification should say some version of the following, pick and choose based on your circumstances:  

“Upon discovery we immediately blocked the offending IPs and shut down all out-bound traffic.  We have begun the process of finding compromised machines.”

“We brought in cyber-security experts to investigate and fix this problem entirely and to ensure that we are more secure in the future.”  

“We advised the credit reporting bureaus and banks of this incident. We are offering a free credit report to every affected party, and here’s how to do that. [Instructions here.]”  

“We are cooperating fully with law enforcement and an investigation is on-going.  There will be full participation and transparency during the investigation.  Employees will be contacted in person if their assistance is required.  Do not provide any personal information, account numbers or passwords to any unverified person via email or on the phone, now or ever.”

“We are currently dedicating money to invest in our IT infrastructure, our security personnel, and monitoring tools so that attacks in the future are thwarted.”


Part III—Here’s What the User Has to Do:  This is where you tell your employees, clients, customers, and/or Partners what they need to do.  You must be exceedingly firm about password changes and policy enforcement while at the same time making this VERY easy for them.  It’s a huge component of rebuilding trust and being transparent throughout the process.  You’ll want to take note of the inclusion of an attachment, which should detail cyber-security best practices that they can use at work or at home.      

“You will be required to choose a new password before you can log into your account.  Everyone must do this, from the newest employee to the CEO of the company—even every member of the IT team to include admin accounts.  It may NOT be the same password as last time.  Your password will be required to have upper and lower case letters, a number, and a symbol.  You cannot use dictionary words.  It must also be at least 8 characters in length.  We apologize for the inconvenience, but this is a very important part of information security. It removes the attacker’s access to our network.  Thoroughness of this step is paramount. 


“You may wish to place a fraud alert or freeze on your credit report, which you can do by contacting the three major credit reporting bureaus, Equifax, Experian, and TransUnion [insert contact info here].  Be aware that you will not be able to borrow money or open a new credit card until you lift the freeze.”

“If your bank has not contacted you about replacing your cards, you may wish to proactively call them and ask for a replacement card.”

“We recommend following industry standards and best practices when it comes to cyber security.  The attached document details steps you can take to better protect yourself from online threats, both professionally and personally.  There is even a section included that focuses on online safety for kids and teens.” 


Part IV—We are Here to Help You:  This is where you point people to your public relations team, who in turn can run point between the employees/clients/partners and the legal team, technical team, management team, etc…  


What?  You don’t have a public relations team/person?  Didn’t anyone tell you that this is a key part of a data breach incident? This is one of those indirect costs of data breaches that no one ever considers during the risk management process.  Yes, it will cost money; you didn’t think data breaches were cheap did you?  Please note the inclusion of a toll-free number and the promise of regular updates.  We define “regular” as at least every two weeks.    

“If you have any questions or concerns, you may contact our offices at: [1-800-555-5555] or email us at [company@ourcompany.com].  Our website: [www.ourcompany.com] will be updated with the latest information as our investigation continues.”

“Again, we apologize for this incident and any inconvenience this causes.  We value your trust and we are committing all resources to resolving this incident quickly and completely, so we can get back to [insert mission statement or “what you do” here].

Sincerely,
[Highest ranking person in your company]


No, I’m not kidding.  Your lawyer should not sign this for you.  Nor should your 3rd party data breach management company.  Not your PR firm, not the head of IT, and definitely not something cutesy like your mascot (even if your mascot is one of the cats in this blog post).  And for crying out loud, I don’t care how big and high profile you are, don’t have the President of the United States address the nation for you either.   

Before you send out this letter, run it by your public relations team/person, your general counsel/lawyer, your data breach response team, and your CEO, who as we discussed above will be signing the letter.    


Gardening, cyber security, and YOU!

$
0
0

Hello again readers! We spent the first week of July on vacation in North Carolina and then I spent a few days last week at the SANS DFIR Summit in Austin. I was going to write a small recap of the DFIR Summit but I think Matt Bromiley summed it all up pretty well in his post and I don't have much more to add, other than my favorite part of the DFIR Summit is actually seeing friends and colleagues in person and of course the sheer amount of networking opportunities. I personally would like to see more time allotted for networking, but there are so many quality presenters that it would be a shame to have fewer presentations.


This blog post is going to cover some additional thoughts that I had on the impromptu Incident Response panel on which I participated, led by Brian Carrier, and also included Frank McClain and Rob Wallace. One of the comments that I made regarding expensive cyber security tools was akin to "you can buy a screwdriver, but you cannot set it on a table and have it magically build you a house". Likewise, it doesn't matter how effectively written or well-thought out a tool is, at the end of the day, it is simply a tool. The functionality and quality of information (or work) that is produced by that tool is entirely dependent on the human that uses it. I could buy the most expensive, top-of-the-line, hammers, screwdrivers, saws, levels, shims (also a type of cache), nails, screws, and so on, but at the end of the day I do not have the skills needed to build a house. In fact, building Lego sets is about the extent of my construction capabilities. 


Unfortunately a lot of vendors market their tool(s) as an "end-all-be-all solution". A lot of decision makers for businesses see this and decide to buy the latest and greatest tool but do not make any investment into the needed individuals to really harness the power of the tool. (My Cyber-Business-Guru/friend, Jack, would note that the mistake is assuming that the tool is a cost-savings over hiring expensive personnel.  You Must Have Both!A good parallel with this can be made regarding our garden and our time away from home over the past few weeks; as you often come back to a garden that is completely unrecognizable from the one that you initially had.


Imagine that a vendor salesperson comes in and pitches the "EXTREME Cyber Security Protector 3000XL" as being able to "stop threats before they happen, in real-time, allowing instantaneous cyber security protection....(and a few other random buzzwords...synergy...end-to-end solution, cost savings, win-win, force multiplier...)". Of course the salesperson makes a great presentation (otherwise they would not be in sales long) and management decides to buy it.


Sure, initially the tool may work fine, but these tools are never meant to be a "set it and forget it" solution. The same can be said about our garden. We kept up on doing regular maintenance, watering, and weeding our garden up until we went on vacation, so it looked similar to this despite our "purchase"* of the most expensive wheelbarrow that I could find:


Newly planted garden. Retrieved July 13, 2015 from http://www.livecreativelyinspired.com/wp-content/uploads/2014/07/marigolds-newly-planted-in-the-vegetable-garden.jpg


So far, so good, right? Well, we got quite a bit of rain it rained Miracle Grow for weeds while we were gone, and upon returning home we got even more rain on a regular basis. Due to all of the precipitation, we did not have an opportunity until this past weekend to perform the needed upkeep to get rid of the weeds and ensure we have a nice garden with the flowers and shrubs that we want, not milkweed, $#&%*! kudzu, and other weeds that we do not want. 


But ... we bought an expensive wheelbarrow. How did this happen??  Retrieved July 13, 2015 from http://www.waldeneffect.org/20100716garden2.jpg

I think that this is a perfect parallel; as we have to perform regular maintenance on the garden to ensure that we have the plants that we want (ie our network, our data,) or else we end up with something that is overrun with weeds and out of control (malware, toolbars, scareware). Having a good team of individuals helping ensure your "garden" (network and devices) is secure, regardless of the tool(s) that is used is much more rewarding in the long run than spending large amounts of money on tools that just sit there and are rendered ineffective in a short period of time. In the end, it isn't about buying the fully automated, ridiculously expensive wheelbarrow, it is about the humans who filled it with the all of the unwanted items that were running rampant in our garden


Now where do you want this malware (weeds)?  Retrieved July 13, 2015 from http://www.summerhouseart.com/blog/wp-content/uploads/2010/03/weed-wagon.jpg

*FULL DISCLAIMER: We did not really purchase the battery powered wheelbarrow and the photos above are not of our garden or our wheelbarrow. 


...at long last, updates to the Live Response Collection!!

$
0
0


Hello again readers! I am happy to announce, after many long months in development (and due to a pretty busy six months, about six months later than I had originally planned) an updated version of the Live Response Collection is available!


The first item that you will probably note is the Windows folder looks very different. I wanted to provide a cleaner look for users, so when you run the LRC against a system it is easier to find the output folder. By having four main folders, instead of about 35, the results will be much easier to see. I moved all of the "tools" into the folder cleverly named "Tools", and all of the scripts into the similarly cleverly named folder "Scripts". While this does not change the function of the tools, it does slightly change file paths leveraged by the old scripts, so you will have to update any custom changes that you made for your environment.


New Windows folder structure


Within the "Scripts" folder I also began the process of what I am calling "Modules", which I started for several reasons. Since all six scripts share a lot of code and functionality, I wanted to reduce the overall size of each file by leveraging code that they share. It makes the maintenance and updates for the LRC easier. It also allows easier user customization, because instead of trying to figure out which large section of code they want to use (or not to use) you can just choose to skip a module completely if you don't want it by replacing the name within the code itself. I plan on writing a future post in the future detailing just how easy it is to write a customized module, complete with a breakout of the variables that the script(s) rely on, so users can add functionality and features easier than ever (<hint hint> and hopefully you share them for inclusion into a future LRC release!)


The beginnings of LRC "modules". There will be more!

As I stated, the overall functions of the LRC did not change terribly much, some Startup folder hashing was added as well as also saving autoruns output to csv, which will be touched on in my next blog post. The next post will also be the publich release of a tool that is also several months in the making, but also several months later than I had originally anticipated to release it. 


LiveResponse.zip - download here

MD5: 8a6ff9be12f4b06dfd0cde08997592b9
SHA-256: e9976375d226e50fe705891bfc4f249abf09d24aa7da5cea27d63c4c7aec5953


Updated: August 20, 2015


Publicly announcing buatapa!!

$
0
0

Hello again readers and welcome back! Today's blog post is going to cover a small script that I developed called "buatapa". This was meant to be released several months ago, but steady case work has kept me busy. I finally carved out some development time to finish up this blog post and push it out publicly at long last!


buatapa

According to the magic of Google Translate, "bua tapa" is the Irish Gaelic translation of the phrase "quick win". 


The phrase "quick win" translated to Irish Gaelic, thanks to Google Translate!


I decided to call my (GASP!) first publicly released Python script "buatapa" for a couple of reasons, with the main reasons being that it is very heavily based off of Brian Baskin's noriben personal malware sandbox, so I wanted to have a cool name for it as well. The results of this script have the potential to indeed give you a "quick win" with trying to find malware on a Windows system.


What buatapa does

The purpose of this script is to collect the data and then run the script against the collected data from a second machine (rather than performing the VirusTotal queries from the suspected compromised system itself) in case there is no network connectivity on the suspected compromised system (like a secured environment, POS environment, etc.) It simply works by parsing the results of autoruns.csv that is generated by Sysinternals autoruns on a Windows system. The script finds Unicode characters, anything that resembles a poweliks Registry entry, and anything that does not have a signed certificate. It then attempts to perform a VirusTotal hash lookup for any files with abnormal characters and unsigned entries and returns the results in an easy to read text file. 


How to set up buatapa

The first thing that is required to get the fullest functionality is to get a VirusTotal API. You can get your public API by heading over to VirusTotal and signing up for an account, if you do not already have one. 

Once you have your account, login to VirusTotal and choose the option under your username of "My API key"


"My API key" option on VirusTotal

When you choose that option, you will be presented with a page like this, which contains your API key. 


Page with your API key, settings, and rate limits

Note that the public API has rate limit queries, which are built into the script automatically (rather than running four in a minute and then waiting for 60 seconds; I chose to do one query every 15 seconds. You can of course modify the script to change the sleep time and query rate if you would like).

Highlight your API key and input it into the script. (It is the exact same code as Noriben, so if you are familiar with that, you should be familiar with this.)


Copy the API key to here (or here) in the script (buatapa and/or noriben)

It is very important to also install the "requests" Python library to your Python distribution if you have not already. I once again defer to Brian Baskin's Python experience (which admittedly dwarfs my own) as he stated:

"Without Requests it cannot do VirusTotal queries. That's the only internet-based functionality. So you have to install requests ("pip install requests")...Requests is the HTTP library that I use. The built-in Python libs are horrible."

So, make sure that you type in run the command 'pip install requests' from a command prompt before you run buatapa or noriben, in order to get the internet functionality that is needed to run the scripts!!


Type in 'pip install requests' from a command prompt to install Requests


Running buatapa


You will have to have Python either natively installed on your system or be running something like Active State Python in order to run buatapa. In order to run buatapa, simply open a command prompt and give the path of where the buatapa script resides. The script will automatically create the output text file in the directory the script was run from, so make sure you have read/write permissions to that directory. For example, don't run it from C:\Windows\System32 unless you open the command prompt with Administrative privileges. You must give the script the "-c" argument to open the autoruns.csv file. 


The results from running buatapa (NOTE: The script is name "personal_buatapa.py" because it has my API key in it)

You do not have to use the Live Response Collection to create the autoruns.csv file (although I did include the output in the latest update, to make life easier for you if you do), however you do indeed have to have the output of autoruns saved as a csv for buatapa to process the file. The text output of autoruns, while easier for human reading, is more difficult to parse and correlate than the csv version.


Results from buatapa

The results are saved as a text file, named "$DATE_$TIME_buatapa_output.txt" (for example 20150825_181703_buatapa_output.txt), with all of the information that autoruns collects about the suspected entry presented in an easy to read text format. If a VirusTotal hit is found, the scan date, detection ration, and VirusTotal report URL will be presented at the very top of the entry. 


Screenshot of a snippet of the buatapa output


buatapa (by default) only looks at unsigned entries, but it also attempts to identify abnormal Unicode characters (anything that is not Windows CP-1252) as well as trying to look for entries that are similar to poweliks. You can change the defaults by giving the script different arguments, which can be seen the -h or --help flag.


buatapa usage


buatapa is by no means meant to replace in-depth analysis; it is meant to provide a faster and easier way to identify potentially compromised systems. buatapa will likely not be able to identify incredibly well-hidden rootkits, digitally-signed malware or never seen before malware, as it is not meant to do that. It is meant to rapidly provide an easy to read list of files that have been identified by VirusTotal as likely being malware that is set to automatically run in an area recognized by autoruns. It will provide you a "quick-win" in identifying the "low hanging fruit" malware. 


As I have said many times in the past (and will continue to say many times in the future) the malware will only be as sophisticated as it needs to be in order to gain access to the data your adversaries are after. If a piece of malware originally written four years ago can steal every credit card transaction in your environment, the adversary will use it. They will not use their "next generation Cloud 2.0 automatic exfiltration memory-only kernel-level rootkit" malware in the event that it might actually get discovered in an environment where very basic malware would suffice. Remember the third party vendor used by Goodwill to process payments last year? The malware that was allegedly used in that compromise displayed every single transaction in a command prompt window and had no method of persistence. If the window had simply been closed by ANY individual, even by accident, or if the system was rebooted, the compromise would have stopped. Hardly "advanced" or "sophisticated", but the malware allegedly ran for 18 months and resulted in 868,000 compromised credit cards.


buatapa.zip - download here

MD5: 0f88d739e019482e28edb4d7b9bfee45
SHA-256: 458fe572249757d16c5c325a85370481cba8a62fa276aabe872500d21acd62fb

Version 0.0.5
Updated: August 26, 2015


If you encounter any bugs or any have suggestions or feedback on the tool, please do not hesitate to let me know!


Introducing Windows Live Response Collection modules...and how to write your own!

$
0
0


Hello again readers and welcome back. Today I am very happy to announce the public release of the latest round of updates to the Live Response Collection. This release focuses on the "modules" that I touched briefly on in the last update. The size of the six main scripts themselves has been greatly reduced and almost all of the code now resides in the folder "Scripts\Windows-Modules". This makes maintaining the code easier (since all six scripts share a large majority of the code, it only has to be edited once instead of six times) and allows even greater customization opportunities for end users. 

There are some small changes to the way the LRC handles data, including a built in check to ensure the date stamp does not have weird characters, which was seen on some UK based systems. The script now attempts to decipher that data properly but, in the event that it cannot, it tries to ensure that backslashes are removed from the date field so that way the output of the tools and system calls are stored properly. 


Writing your own module!!


The main focus of this update is demonstrating how easy it is to create your own module. I attempted to make this process as easy as possible, so if you want to write/add modules, you can do so very easily. Since it is written in batch, you can write your own module however you would like, but following this methodology should present the best results and ensure that the script will error out rather than possibly present bad data to you.

The first thing you have to do is choose an executable (or system call) that you would like to add. In this particular case, I decided that the "Wireless NetView" executable from nirsoft would be a good choice for the walk through. The first thing you have to do is to download the zip file from their website. Once that is done, navigate to the folder and unzip the file. Once that is done, you should see a folder like this. 


Contents of the folder "wirelessnetview"

Copy that folder to the "Tools" directory under the Windows Live Response folder. 


wirelessnetview folder under "Tools"

Once that is done, you are ready to begin writing your module!


Initial Steps of Module Creation

This version of the Live Response Collection contains a file in the "Windows-Modules" folder called "Windows-Module-Template.bat". Open that file in your favorite text editing program.


Contents of Windows-Module-Template.bat

Once you have it open, save it as the tool name that you would like to run. In this case, I would open the file "Windows-Module-Template.bat" and save it as "wirelessnetview.bat". 


Saving the template as our new module


Now you can begin to edit the "wirelessnetview.bat" module and add more functionality to the LRC! 


Writing the module


I tried to make it as easy as possible to do substitutions within the template, so really the only things you will have to do are:

1) Have an understanding of what command line arguments you need to give your executable file (or system command), and 
2) Be able to find and replace text within your new batch script

You should not have to change any of the environment and script variables, so I will not cover them in great detail, unless a specific request is made to do so. Here is a full listing of the items that you should replace (Ctrl + H in most cases):

YYYYMMDD - Four digit year, two digit month, and two digit day (19970829, 20150915)

DD - Date you wrote the module, with two digits (03, 11, 24, 31)

Month - Month you wrote the module (July, March, December)

YYYY - Year you wrote the module (2015, 2016, 4545)

[Your Name] - Your name, if you want to put it in there (Brian Moran, Leeroy Jenkins)

[you@emailaddress] - Your email address, if you want to put it in there (tony@starkindustries.com, info@mrrobot.com)

[Twitter name] - Your Twitter name, if you want to put it in there (Captain America, Star Wars)

[@Twitterhandle] - Your Twitter handle, if you want to put it in there (@captainamerica, @starwars)

[MODULENAME] - What you want to call your module. I prefer to use the tool name, so in this case WIRELESSNETVIEW

[Tool path] - This is the path, within the tools folder, of the folder name and the exe. In this case, it would be wirelessnetview\WirelessNetView.exe

[command line arguments] - This is where you have to do some testing of running your tool from the command line before you create the module. In this particular case, I am going to use what is listed on the web page as the command I want to run. The full command is 

WirelessNetView.exe /shtml "f:\temp\wireless.html", so our [command line arguments] in this case would be   /shtml

[Output folder] - The folder that you want to output the data to. Since this is network related, saving it under "NetworkInfo" seems like a good idea.

[Output file name and file extension] - The filename that you want to save the file as. Generally I make this the name of the tool, so I would call this one "Wirelessnetview.html".

[Tool name] - The name of the tool. (Wirelessnetview)

[Executable name] - The name of the executable (WirelessNetView.exe)

[Executable download location, if applicable] - The URL where you downloaded the tool from (in this case, http://www.nirsoft.net/utils/wireless_network_view.html)

And that is it!

**Please note that you can choose between modifying saving output directly, or saving output from the executable/command itself. It is best to refer to the executable or system command when trying to determine "how" you should save the output.**


So when we modify the wirelessnetview.bat file, we replace the following items with their value:

YYYYMMDD - is replaced with 20150917

DD - is replaced with 17

Month - is replaced with September

YYYY - is replaced with 2015

[Your Name] - is replaced with Brian Moran

[you@emailaddress] - is replaced with brian@brimorlabs.com

[Twitter name] - is replaced with BriMor Labs

[@Twitterhandle] - is replaced with @BriMorLabs

[MODULENAME] - is replaced with WIRELESSNETVIEW

[Tool path] - is replaced with wirelessnetview\WirelessNetView.exe

[command line arguments] - is replaced with /shtml

[Output folder] - is replaced with NetworkInfo

[Output file name and file extension] - is replaced with Wirelessnetview.html

[Tool name] - is replaced with Wirelessnetview

[Executable name] - is replaced with WirelessNetView.exe

[Executable download location, if applicable] - is replaced with http://www.nirsoft.net/utils/wireless_network_view.html


Screenshot of our new module, after replacing the text!

Now that our module is written, we have to add the module to whichever batch scripts we would like. I usually like to keep the modules that perform similar functions near each other, so in this case I am going to choose to add it after the PRCVIEWMODULE. The easiest way to do this is simply copy the five lines of text associated with the PRCVIEWMODULE entry, and paste it below it.


Selecting the code associated with PRCVIEWMODULE


Copying the code associated with PRCVIEWMODULE to create a new subroutine for our new module


Once you have it copied, change the line GOTO ....MODULE in the original module to the name of your new module. In this case, we would change it to GOTO WIRELESSNETVIEWMODULE.  Then change the name of the subroutine itself to the name of your module, in this case WIRELESSNETVIEWMODULE. 


Adding WIRELESSNETVIEWMODULE code

Finally, change the name of the batch script that is being called to the name of your newly created script, then save it. That is it, you are all done!


Our module is fully added!

It is best to run your module(s) on a test system before deploying it widely, just to ensure that everything works properly. Also ensure that you add the code for your new module to each of the six batch scripts, if you so desire. 


I hope that this tutorial has been helpful, please do not hesitate to contact me if you have any additional questions or comments as you create your own modules for the Live Response Collection!


LiveResponse.zip - download here

MD5: 18f6fc3a7b15f56b0b5bb9f6f635850c
SHA-256: a460646fdd028392afee317c1a29365eee479fbcce0e464916366f63b500b637


Updated: September 21, 2015


Putting a wrap on October

$
0
0

Hello again readers and welcome back! For us, October consisted of a lot of traveling giving presentations about the Live Response Collection at BSides Raleigh, Anne Arundel Community College, WomenEtc. (Richmond, Virginia), and the Open Source Digital Forensics Conference (OSDFCON). I just posted the presentation that I gave at OSDFCon on slideshare, if you would like to view the slides!


NOTE: I made some slight variations on the presentation at each venue, so if you attended one (or more!) of my talks you will notice that the slides are similar, but may not be exactly what you saw. 


All of the events that I spoke at were great, but I was most impressed with OSDFCon this year. There was an incredible lineup of speakers at the event and the venue and presentation was fantastic (And thanks again goes out to Ali for all of her hard work, mainly behind the scenes, to ensure the event went smoothly!). There were quite a few students and other new entrants into the DFIR community at this years event, which is always great to see. Hopefully that trend continues, as there is not a single person within the DFIR community who has gotten to where they are today without the help, collaboration, and communication of others!


Not to give away any spoilers, but I am working on some exciting updates for the Live Response Collection, primarily on the OSX side, that I hope to have out before the end of the year. I am always looking for anyone who can devote any time or resources for beta testing, so if you want to help please do not hesitate to reach out!


Viewing all 59 articles
Browse latest View live